Since the start of my plotter painting journey, I have received many wonderful questions about my practice. What plotters do you use? How do you refill the brush? What paper do you use? Why?
I LOVE answering these questions and seeing curiosities turning into actions. But because these conversations often happen over short messages, my answers are shortened, incomplete, and need references.
In this article, I summarized 20+ questions I have frequently received in the past years. I aim to provide concise yet complete answers to these questions.

1. Which plotter do you use? Is it a plotter made for watercolor? Where to buy them?
I use
Axidraw
plotters made by
Evil Mad Scientist Lab
(recently acquired by Bantam Tools). They are not specifically made for watercolor paintings. You can use various tools on them to draw, paint, scratch, sew, cut, etc.
I have several A3 Axidraws (V3/A3 and SE/A3), and an A1 Axidraw. I bought all of them directly from the
Axidraw Website
. If you want to buy one and intend to paint with it, I'd recommend:
-
Buy A3 or larger because paint trays could take a significant part of your plotting area.
-
Buy the brushless servo version. They are so much more durable than the SG90 servo motor.
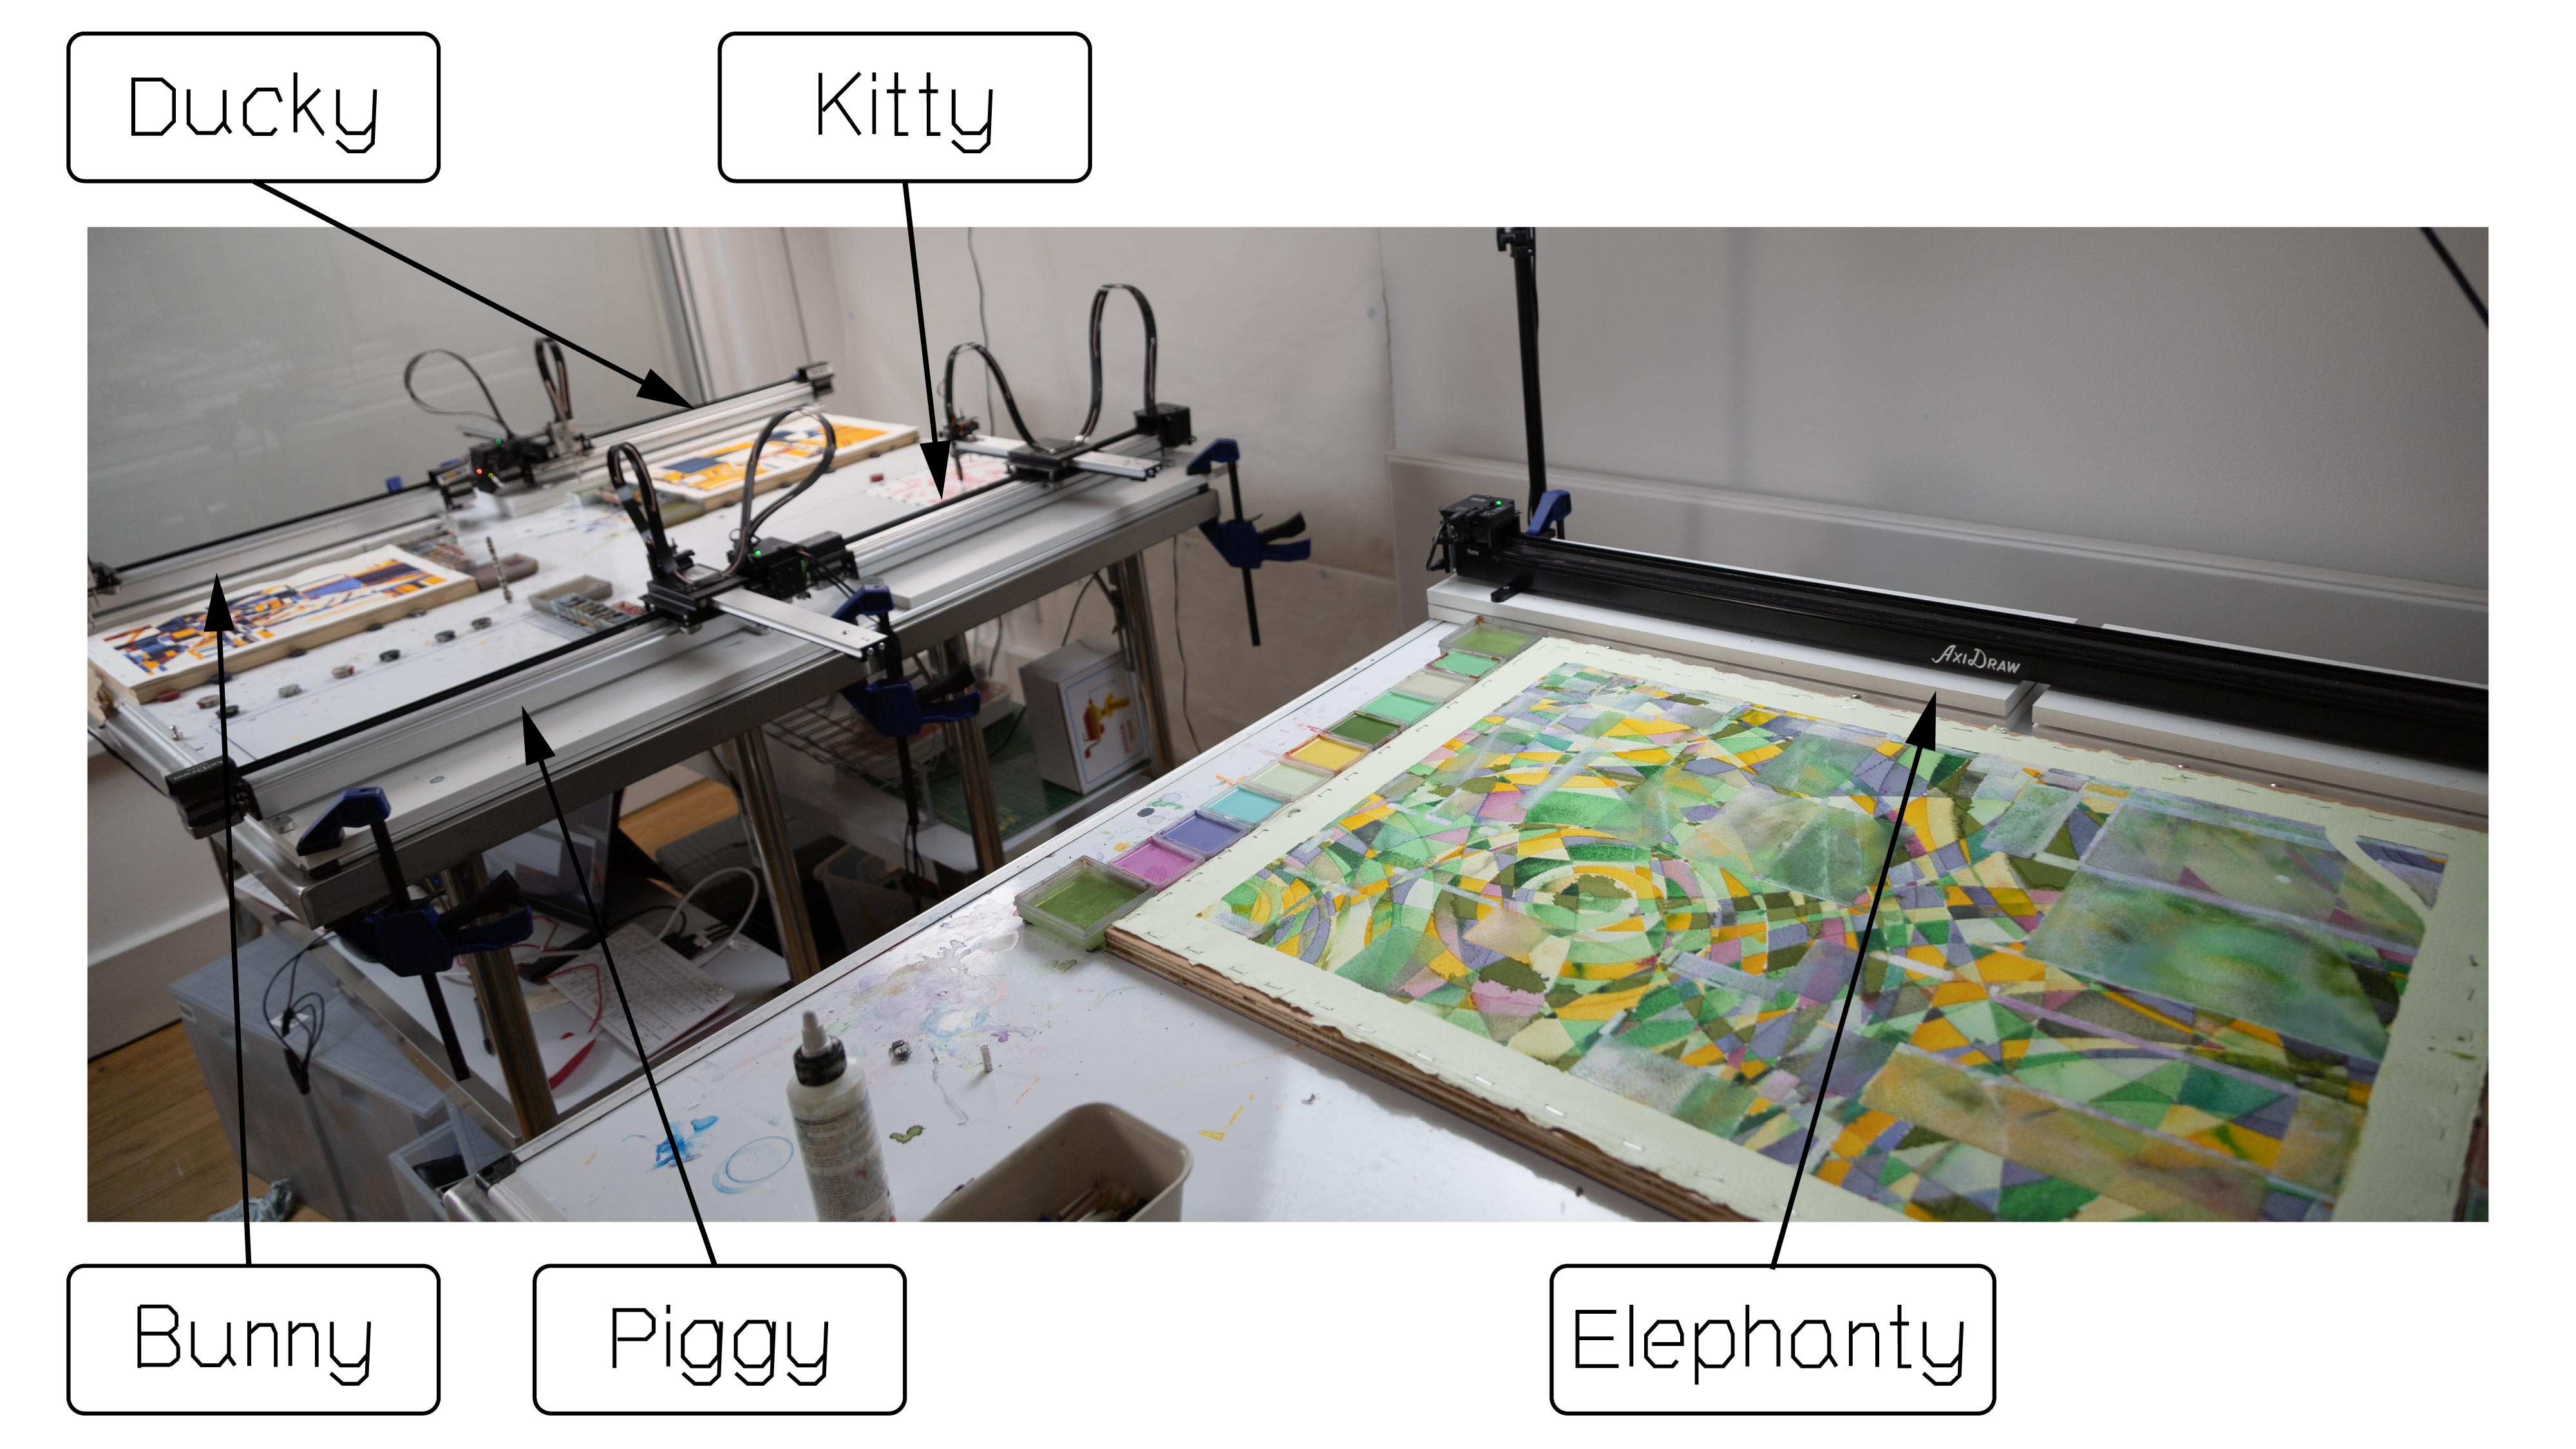
![]()
Figure 1: My current plotter family
2. I have a different plotter. Can I still paint with it?
Absolutely! Here are a couple of points to consider:
-
Check if your plotter can hold a brush. Some plotters require customized brush adaptors.
-
If your plotter is vertical (hanging on a wall), watercolor and other fluid paint would drip because of gravity. But you can still paint with thick, paste-like materials.
-
If your plotter features a paper feeder, consider how wet area would go through the feeder and how that impacts your machine.
3. How do you plot with watercolor/acrylic/paint? Do you have to modify your plotter?
Painting with plotters takes a combined effort from 3 directions:
-
Preparation of the plotting space
-
Preparation of the plotter instruction
-
Preparation of the material
Usually, you don't need to modify your plotter at all because plotters (the robots) do not care about what you are creating. They have no knowledge of what kind of tools they are holding, and what surfaces they are "drawing" on.
Plotters, regardless of brands and models, mostly "speak" of a straightforward language (I call this the "
plotter language
"). The language is so simple that it only contains three sentences.
-
Go to a location: Given a point (x, y), move the plotter-held tool to this location. i.e., move(x,y)
-
Lift the pen/tool: Move the plotter-held tool in the positive Z axis. i.e., pen_up()
-
Lower the pen: pen_down()
So, whether you are trying to draw, paint, scratch, etch, sew, cut, or tattoo with your plotter, as long as you can figure out a set of instructions that consists of these three sentences, your plotter can do it.
4. How do you prepare your plotting space?
I think about a couple of things when I prepare my plotting space.
-
Is it safe?
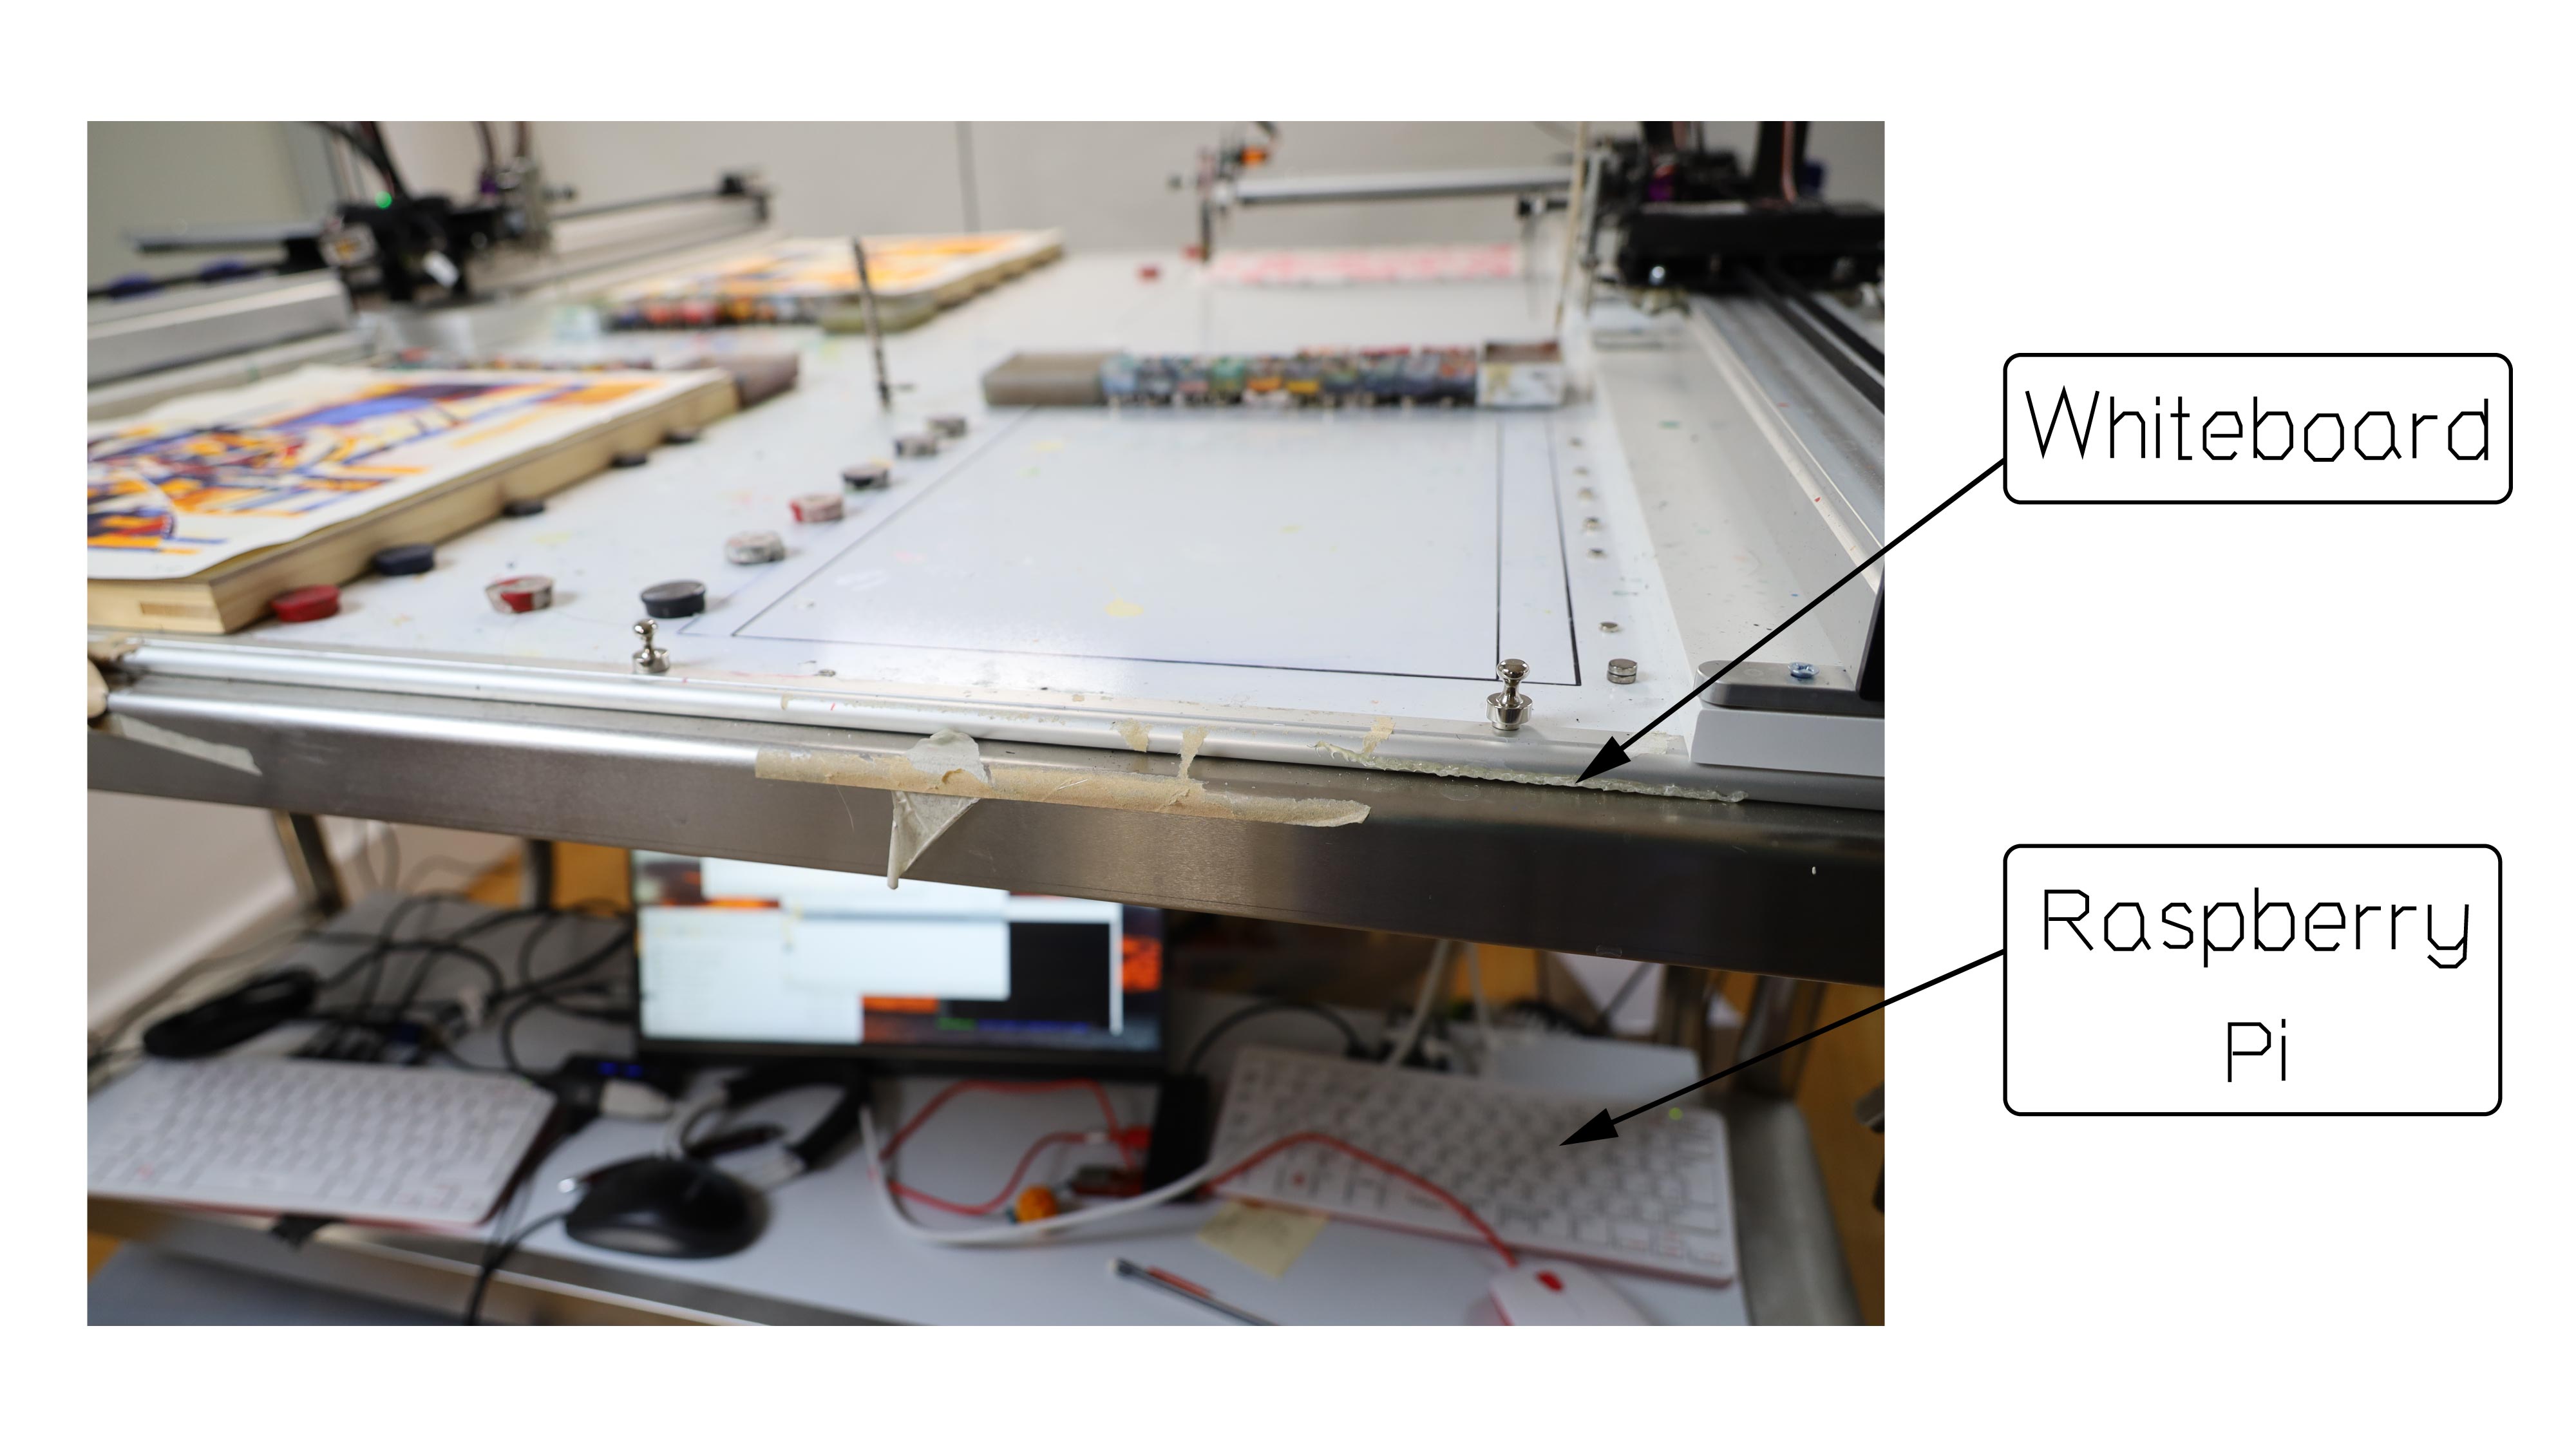
Because I am using paint and water near the machine, it's important to consider where these liquids would go if an accident happens. My top priority is to keep my machines away from flooding, so I raise my plotters to a higher ground with wooden boards. My computers, screens, and cables are on a shelf underneath the plotting area, where they are safe from accidental floods.
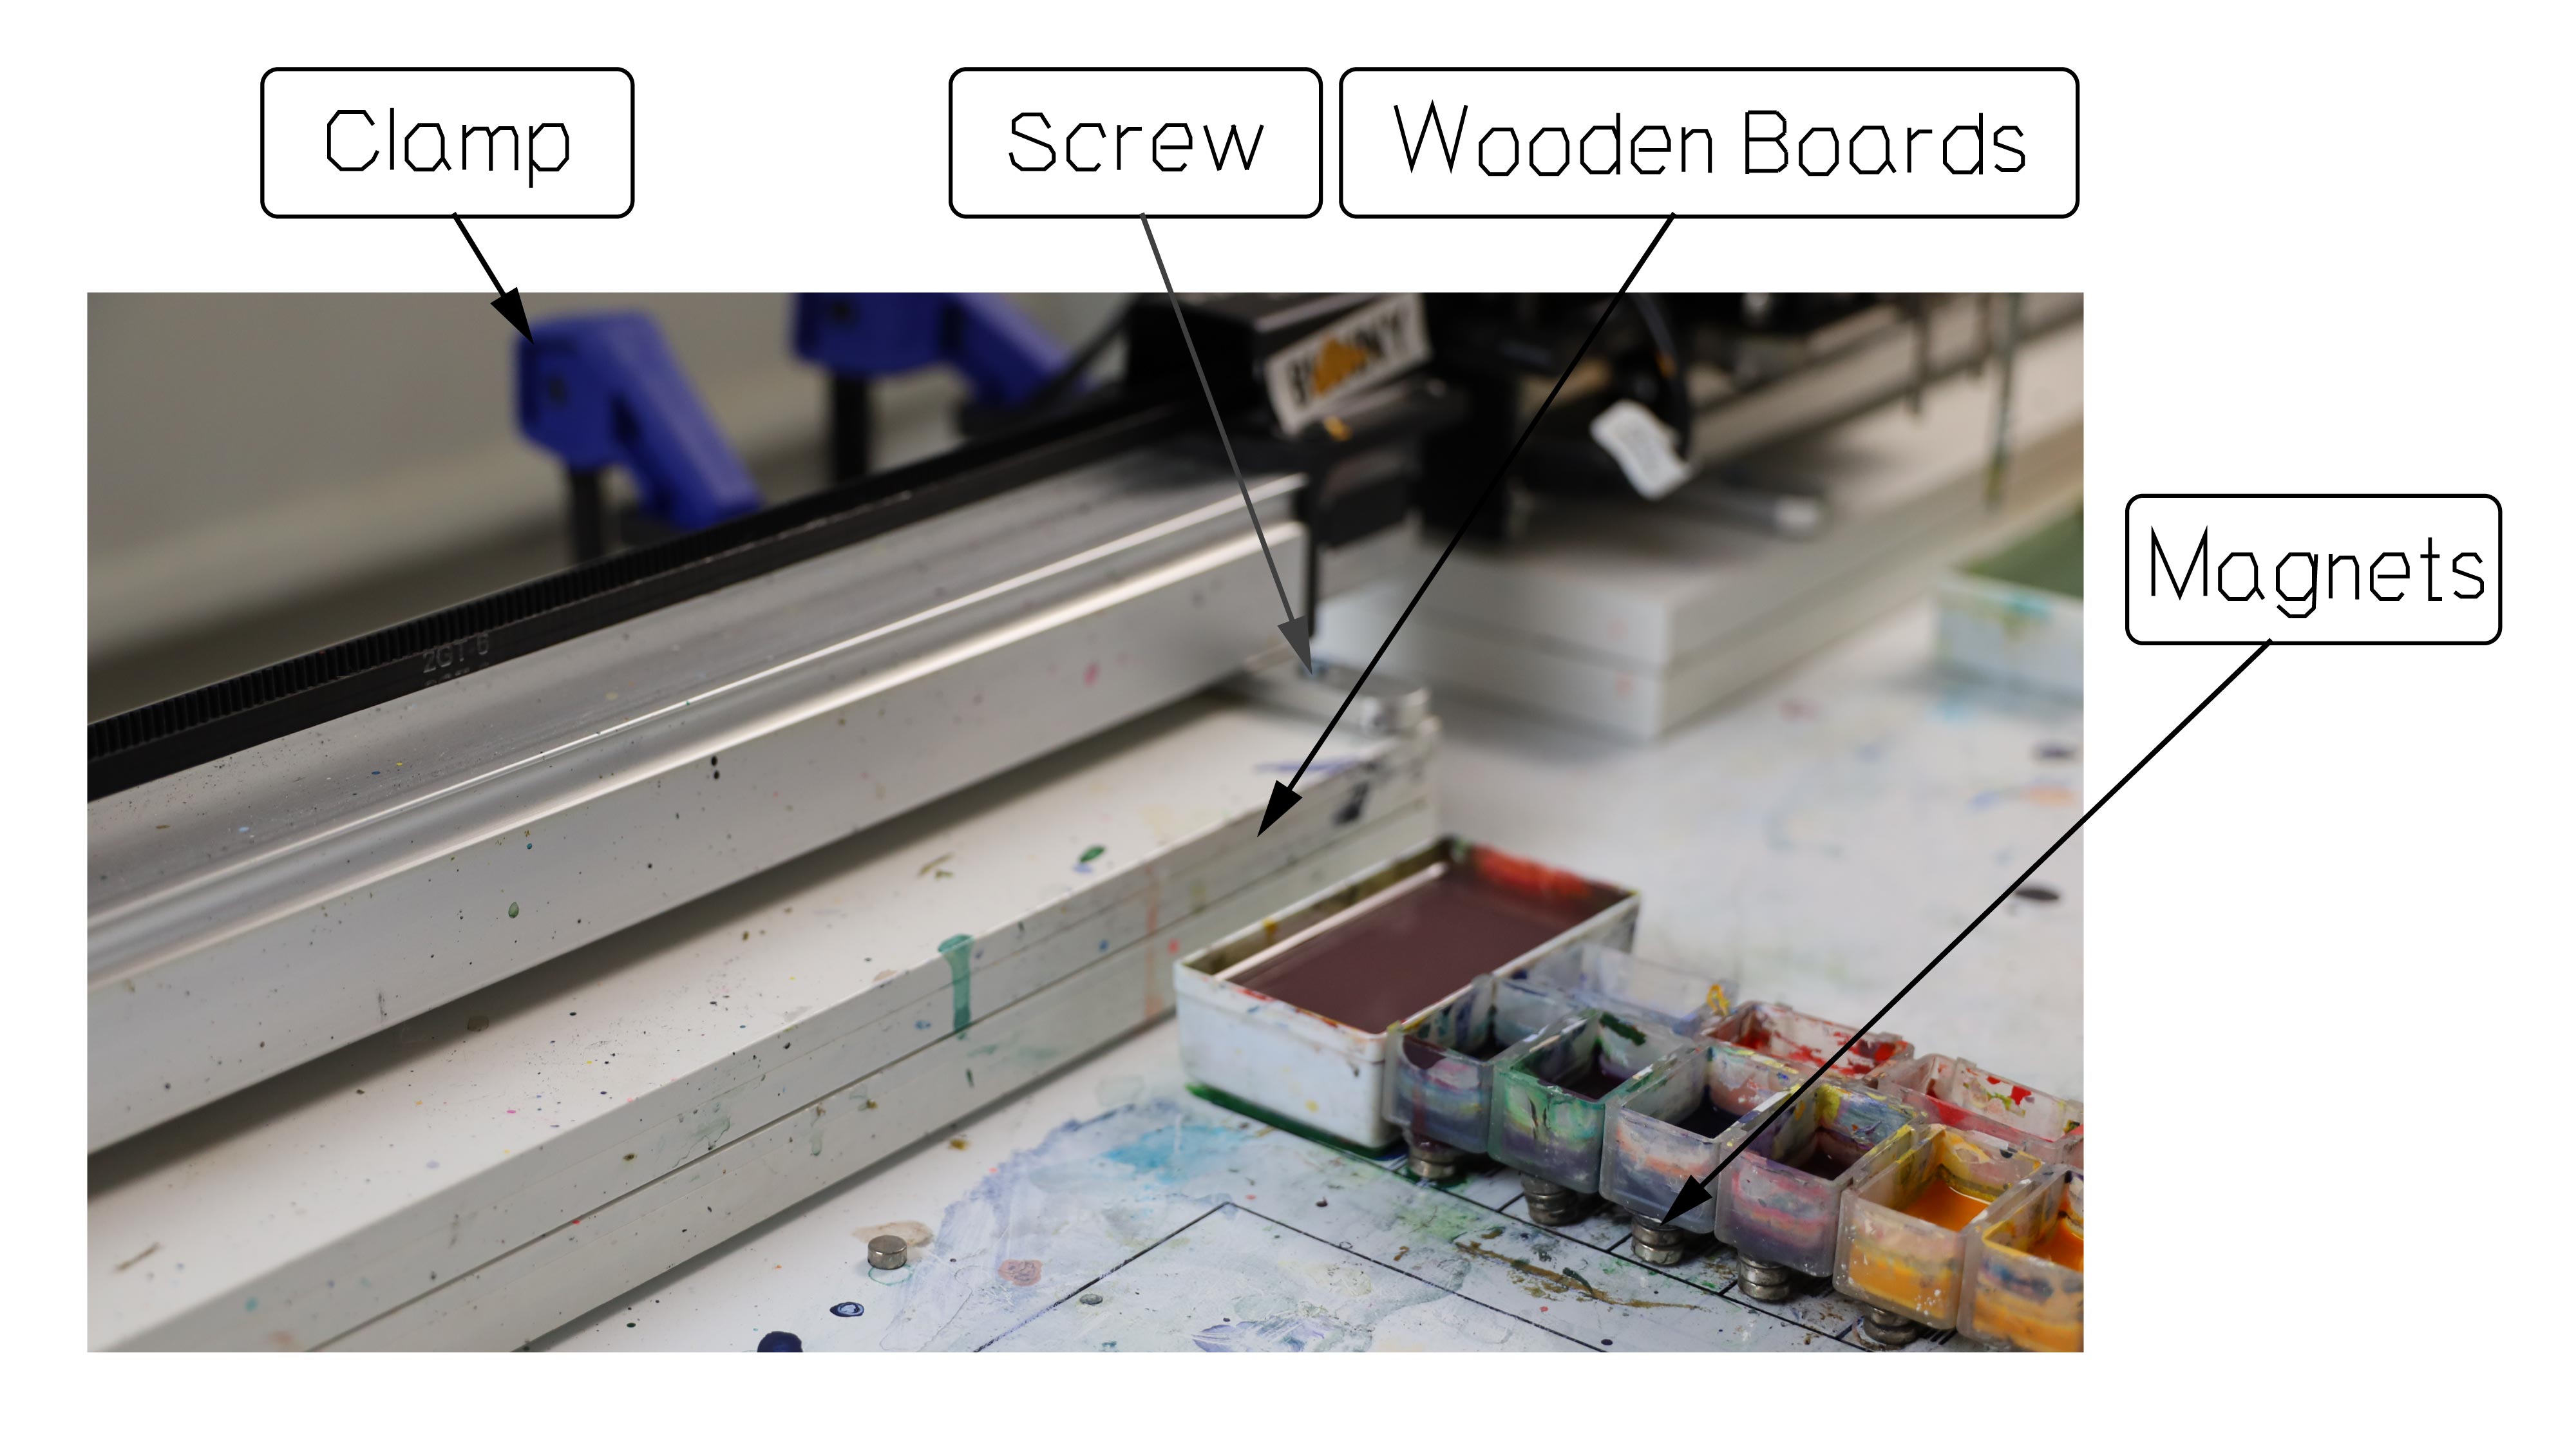
-
Is everything fixed?
I use clamps, screws, staples, and magnets to fix everything used in the plotting process. The only thing moving on the table should be the plotter arm. If I accidentally bump into my table, nothing should move or fall off the table.
-
Is it easy to clean?
Accidents can happen, and paint can go everywhere. I use easy-to-clean table tops (magnetic whiteboards) and cover all the wall spaces around the plotter. Also, wear aprons and gloves when preparing the plotter material.
![]()
Figure 2: My plotter setup: the plotter arm should be the only thing moving on the table.
5. How to control the plotter?
This answer is specific to Axidraw. To control an Axidraw, you need a computer. I am using
Raspberry PIs
to manage all of my axidraws. To send plotting instructions, you have multiple options. The options I have tried are:
-
Plot via vector image (SVG) using the Axidraw Inkscape Plugin. The plugin gives you a graphical interface to control the plotter and modify settings.
-
Plot via Python scripts using
pyaxidraw, a Python-based library by EMSL
. Using this library, you can directly use foundational-level functions like move(x,y) and pen_up(). I use this method because it's more flexible (allows me to adjust settings in the middle of the plot) and faster (loading large SVGs through Inkscape is difficult for my Raspberry Pi).
![]()
Figure 3: My plotter setup: I control my plotters with Raspberry Pi.
6. What paper do you use and why?
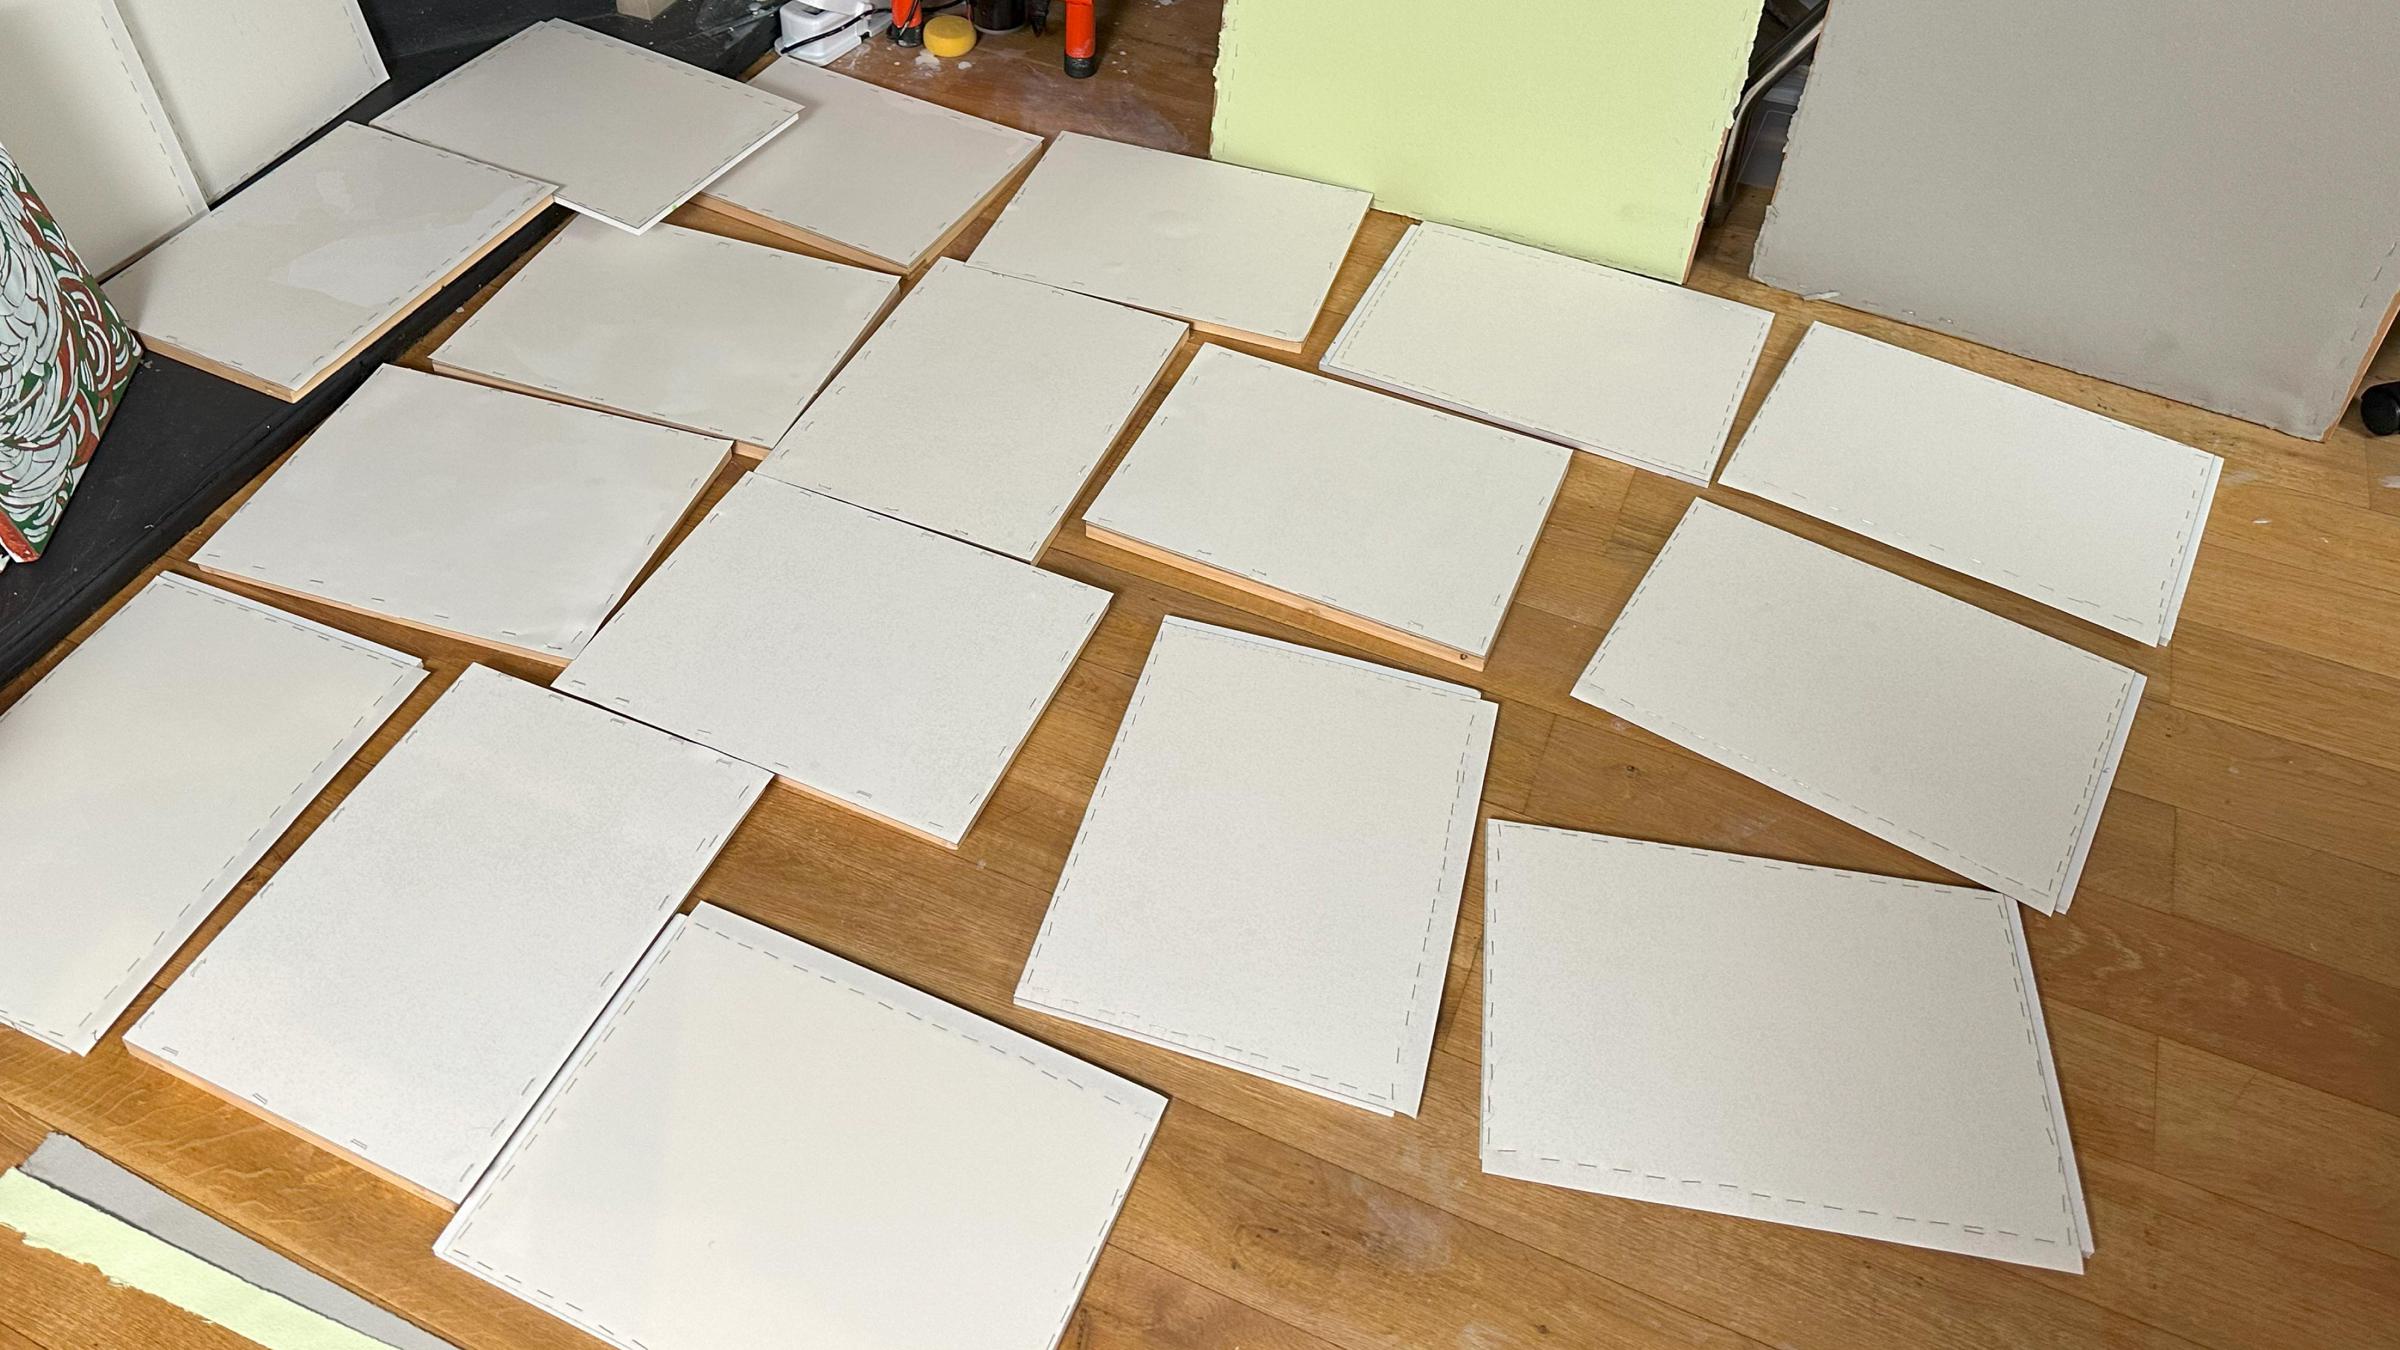
I use 300gsm watercolor paper. I have tried many brands, and my current favorite is Arches Aquarelle block. I've tried all three textures (hot press, cold press, and rough) and love them all.
I stretch my watercolor paper before plotting to reduce the budging effect during the painting process. I stretch paper using staples and gator/plywood boards. The stretching process goes as follows:
-
Soak the paper (10-20 minutes).
-
Drain excessive water until there is no dripping.
-
Staple the wet paper to the board.
-
Let dry.
Alternatively, I've tried Yupo paper, a synthetic paper that does not require stretching. However, paints on Yupo paper take a long time to dry.
![]()
Figure 4: I stretch my watercolor paper using plywood boards and gator boards.
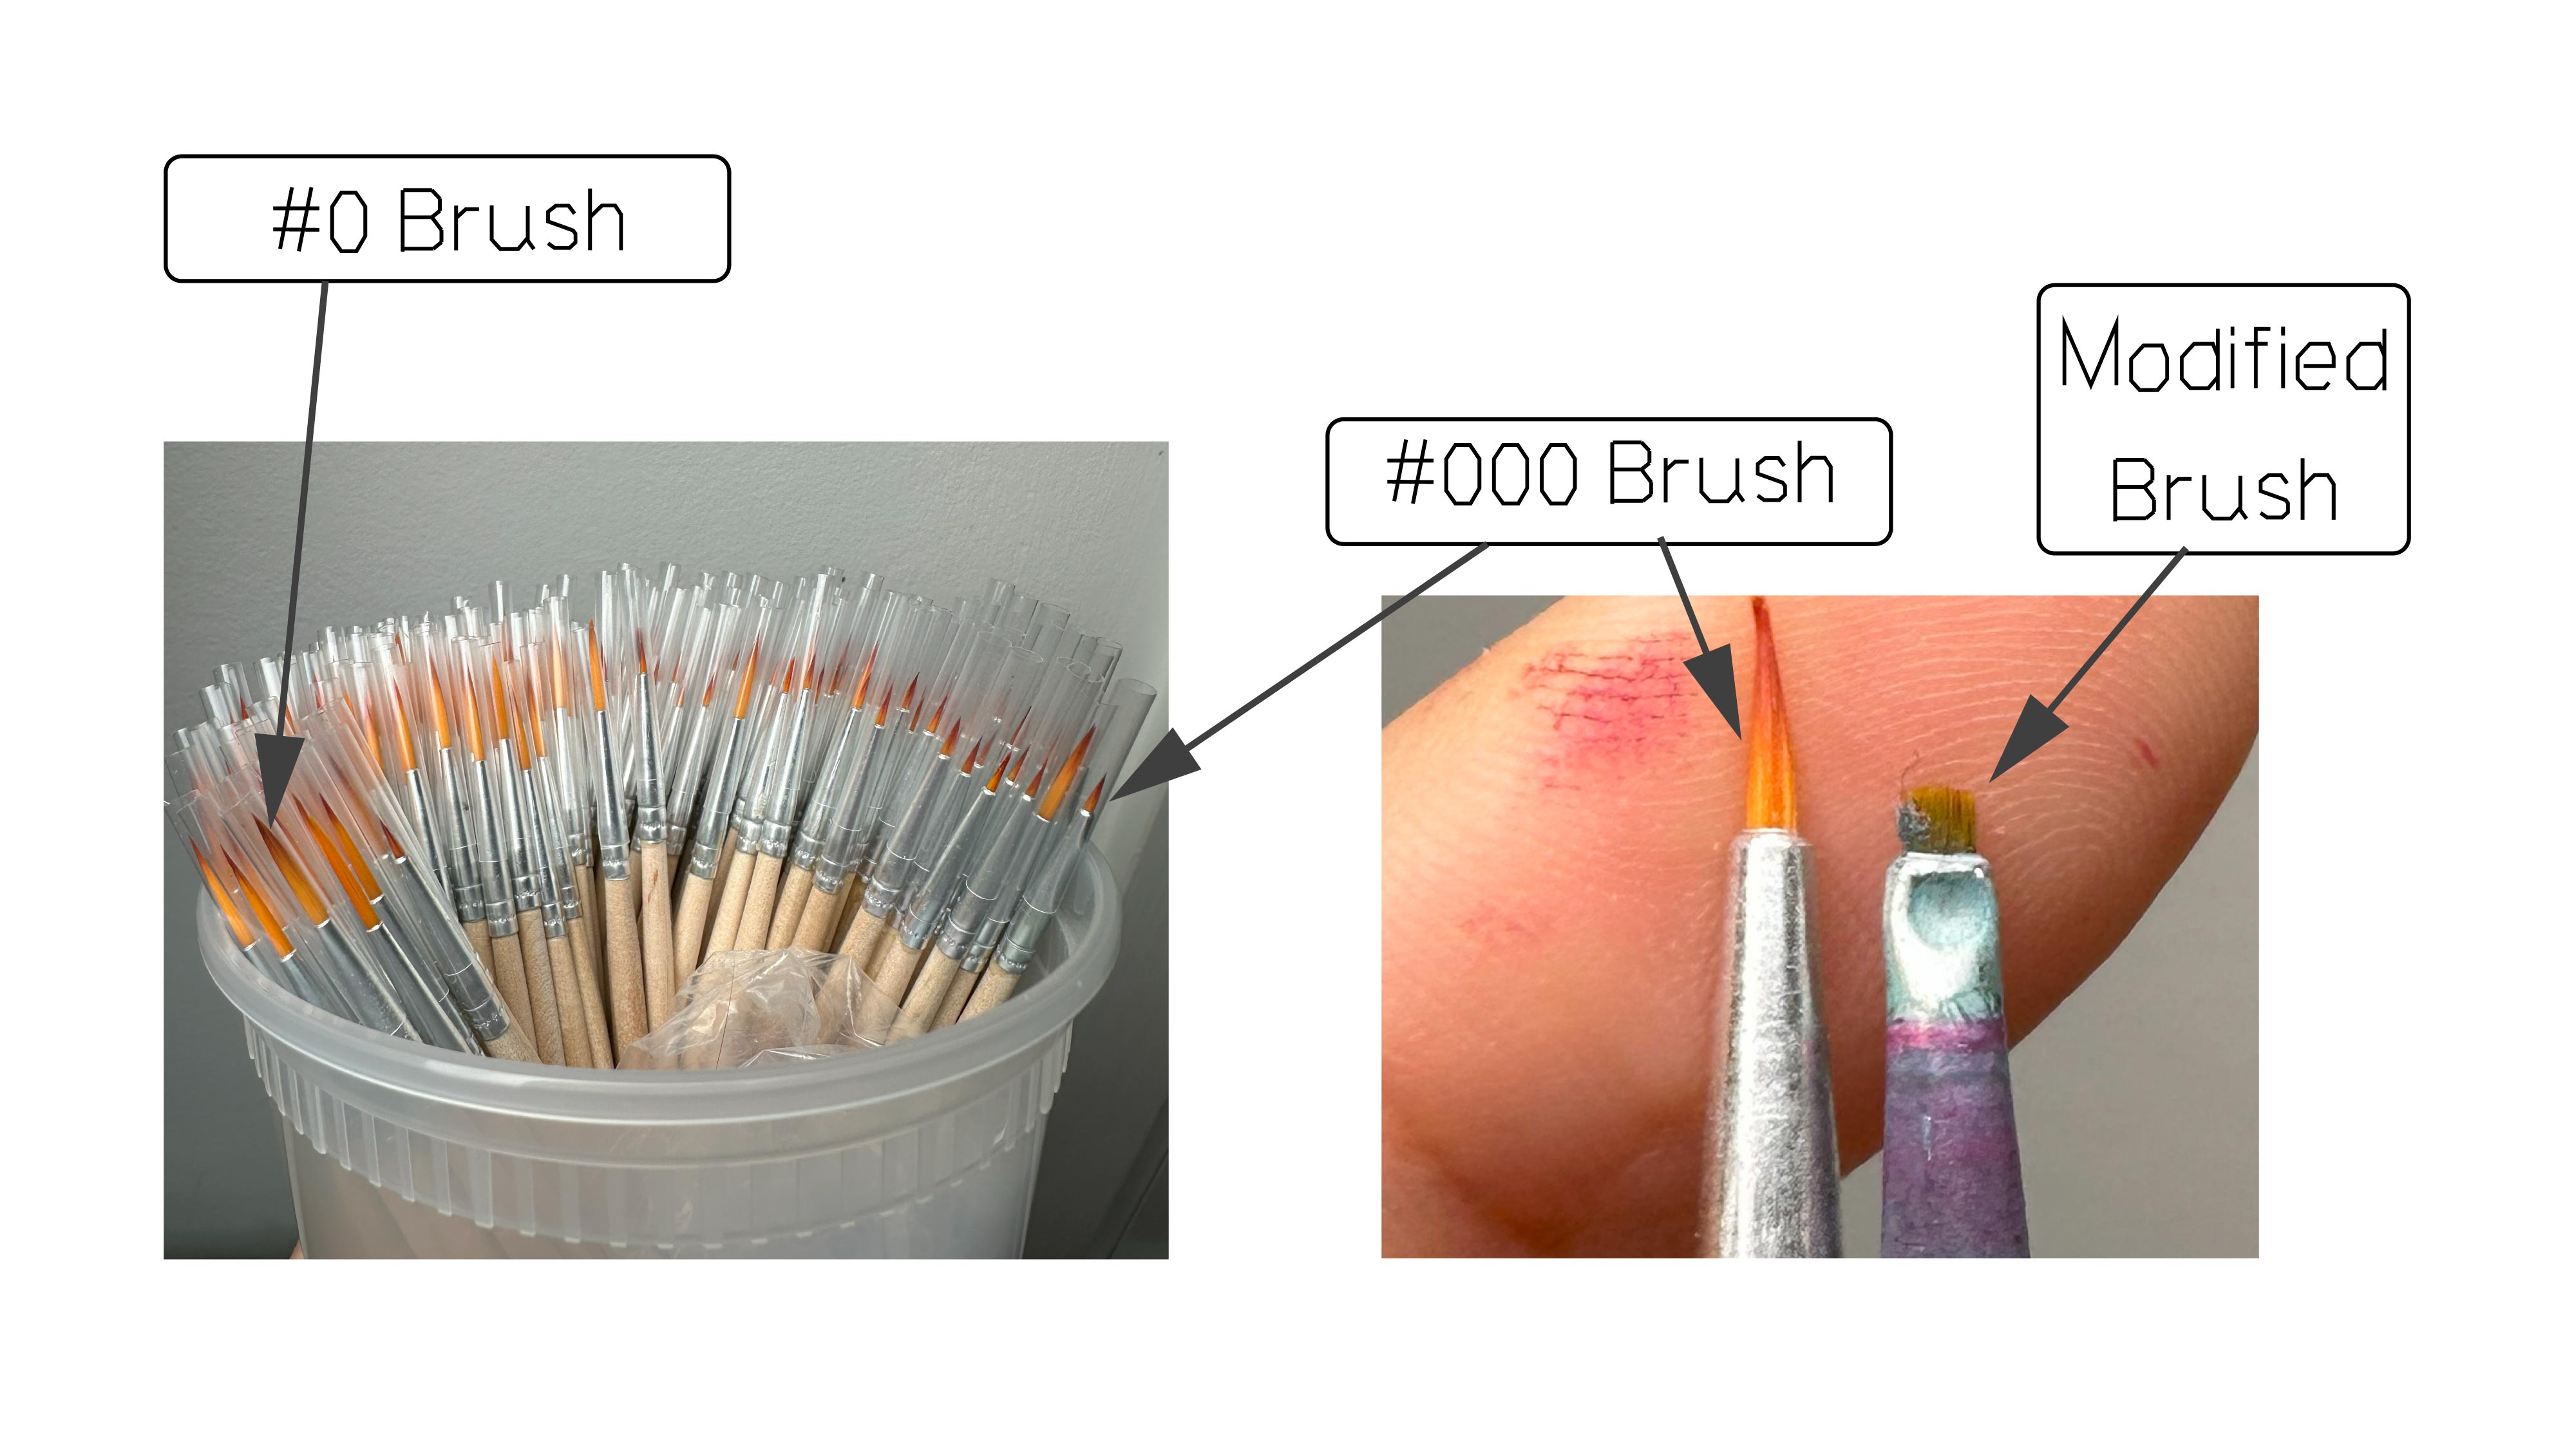
7. What brush do you use and why?
I use modified, extra-fine watercolor brushes. They are the finest brushes I can find on the market. I cut them down into a couple of millimeters long.
I cut them because long brushes will hold more paint. When the plotter arm moves, excessive paint would likely drip. Besides solving the dripping issue, a short brush makes it possible to paint more precisely. I recommend searching for economical options rather than professional-grade watercolor brushes because brushes wear out quickly on plotters.
![]()
Figure 5: I use customized, extra-fine watercolor brushes for my plotter paintings.
8. What paint do you use and why?
I have primarily used four types of paints in the past few years.
-
Ink: Mostly dye-based fountain pen inks. They come in a great variety of colors and brands. They are mixable, vivid, and have fun effects such as sheening and shimmering. They also do not require any stirring during the plotter process because they are dye-based (color soluble in water). The downside is that their lightfastness could be poor. It's important to avoid placing your paintings under direct sunlight exposure.
-
Watercolor: More challenging to plot with because pigments (colors not soluble in water) will settle on the bottom of the inkwells. In addition to adding stirring instructions, I also need to optimize the plotting space setup so the brush can reach the bottom of the inkwells. But watercolors are magical, so they are worth the effort.
-
Liquid Pigment: I mostly use liquid pigment from Aqua, a brand that produces printmaking ink. These are fluid paints made for monotypes in printmaking. I especially love using white liquid pigment because of its fantastic coverage. The downside is that it takes longer to dry, especially if a thick layer is applied.
-
Acrylic: Acrylic paints come with the most fantastic range of modifiers. I use high-flow acrylic paint and acrylic mediums for some of my works. When they dry, they might leave a shiny surface.
![]()
Figure 6: I mix various types of water-based paints and mediums in my paintings.
9. What else have you tried?
Various markers, pens, pencils, pastels, eye shadow, stamps, thread, knife, needle, and glue. As explained in
Question 3
, the plotter does not care what tool you are holding, so anything could work as long as you can fit it onto your plotter.
![]()
Figure 7: Thread is one of the exciting materials I have tried with my plotter.
Yes, you can make embroideries with your plotter.
10. Is there anything else you need to make plotter paintings?
Here are a couple of studio essentials for me:
-
Magnetic whiteboard: used as the base (tabletop) so that I can quickly fix items on the table.
-
Magnets: used to fix paper and inkwells.
-
Syringe: used to transport ink/paint and also as storage for leftover paints.
-
Gloves, aprons, and artist's soap.
-
Various tapes and glues.
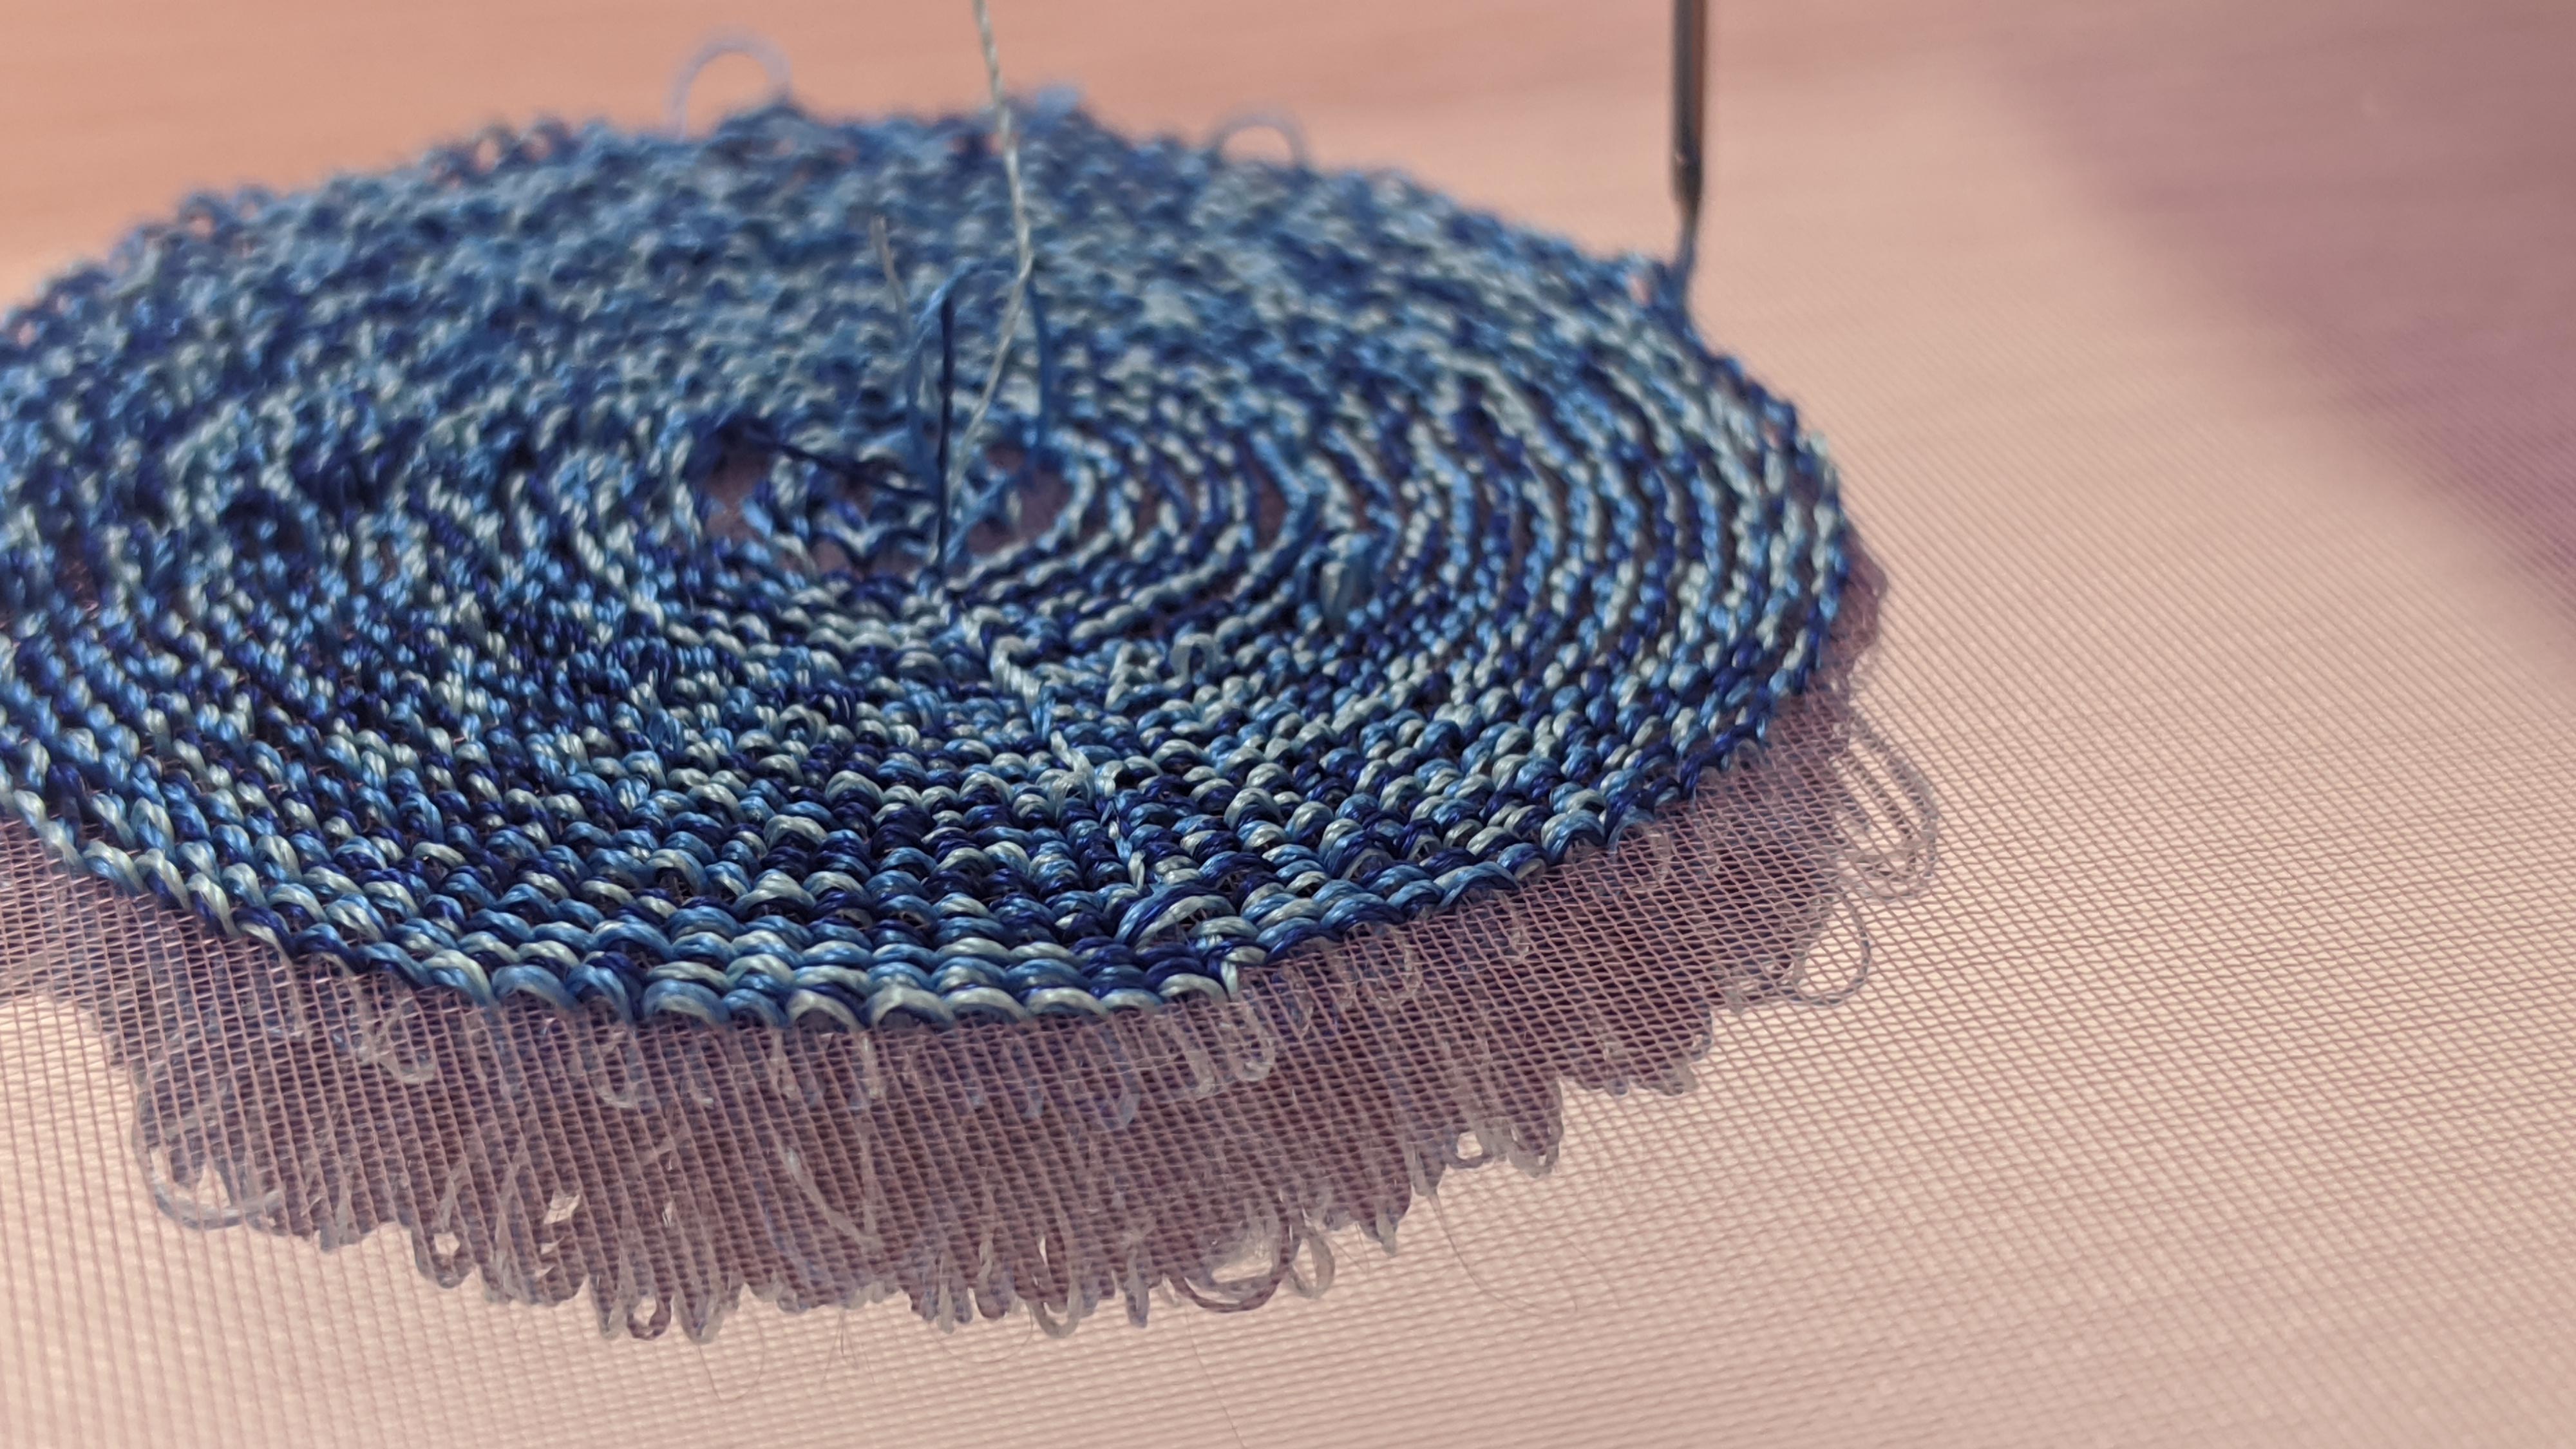
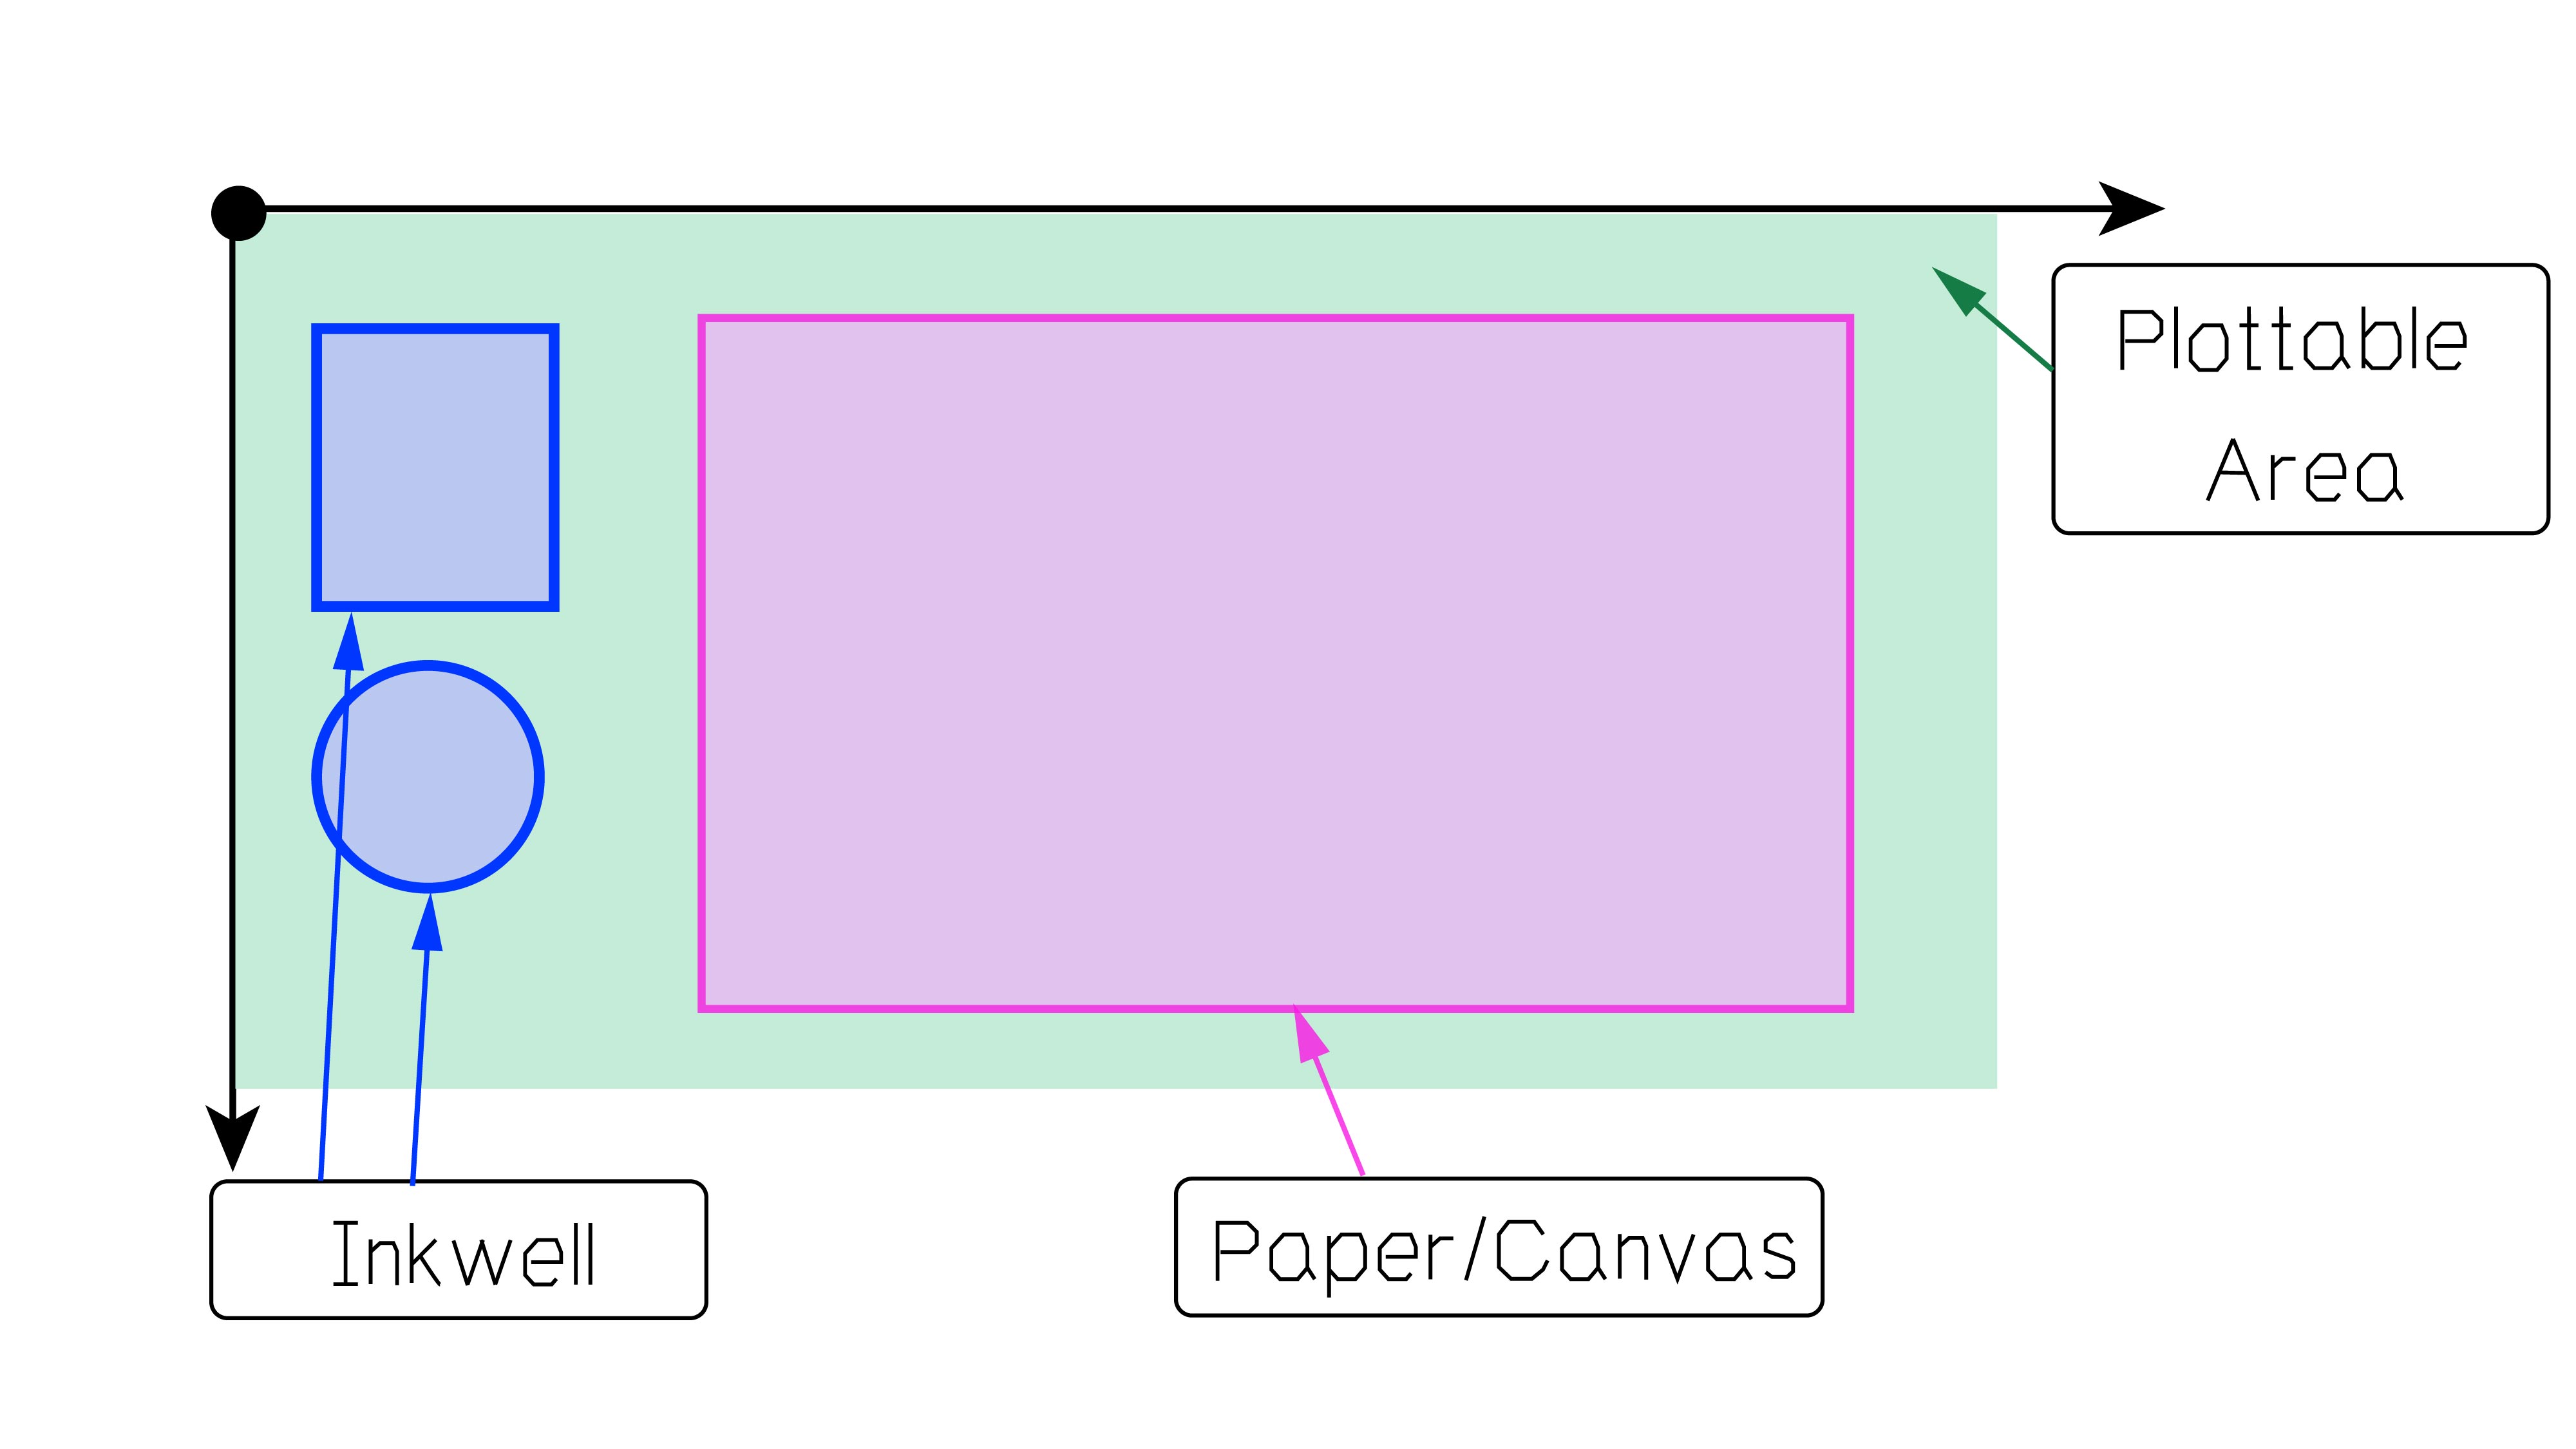
11. How does the plotter know where and how to dip the brush and refill?
Plotters (the hardware) don't care about where and how to dip. The location of the plotter arm is entirely under your control (through the move() function). Therefore, you need to decide
where
to place your inkwells and
how
you want to refill them.
For the "where" part, it's up to you. You can place it anywhere within your plottable area. Typically, I put my inkwells on the leftmost or the rightmost area. You could place inkwells in the center of your plottable area if you want (let's say you are plotting on a piece of donut-shaped paper.)
For the "how" part, the goal is to find a group of actions (in the plotter language) that would refill the paint. I call this the
refill action
. If the word "action" is confusing, you can also think of it as a 2D path, refill path, or mark your plotter needs to draw to refill. The plotter draws this mark at a specific location (inside the inkwell) to reload your brush.
To find the refill action, you want to consider the properties of your paint. If your paint doesn't need to be stirred (e.g., ink), then the refill action could be a simple dipping, which is achieved by
-
move to the inkwell location
-
lower the brush with pen_down()
-
raise the brush with pen_up()
If your paint needs to be stirred (e.g., watercolor), you could use a more elaborate refill path, such as drawing a rectangle in the location of the inkwell.
![]()
Figure 8: You can place your inkwell and paper anywhere within your plottable area.
`
12. How does the plotter know when to refill?
Plotters (the hardware) don't know the brush is empty. As explained in
Question 3
, plotters speak a super simple language and likely do not have additional sensors. So, plotters (the hardware) do not have any information about the state of the brush.
You, the artist/designer/plotter-instruction provider, must keep track of the brush status when you write the instructions. When you decide that the brush needs a refill, you instruct your plotter to go to a particular location and perform a refill action.
13. How do you know when to refill?
I determine the maximum painting length of my brush by running a simple test manually.
-
Dip my customized brush into the exact paint I am using
-
Draw a straight line until it runs out of paint
-
Measure how long it lasted; this distance is the maximum length my brush can draw before refilling. I call this distance "
refill distance
."
I often adjust the refill distance depending on the effect I want. For instance, if I want a more saturated look, I reduce the refill distance to reduce the possibility of having dry marks.
Once I have the refill distance, I cut all of my drawings (paths, vectors, lists of coordinates) into chunks shorter than this distance. After each chunk, I insert one refill action (described in
Q11
).
![]()
Figure 9: key aspects of plotter paintings instructions: decides where to refill (define refill distance) and how to refill (define refill path).
14. How do you generate your plotter painting instructions?
I built almost all of my plotter painting instructions through a library I developed in Python. Here are my typical steps:
-
Sketch out ideas
-
Program the image-generating algorithm. The output of the algorithm is a list of paths.
-
My library performs processing steps to ensure the image (the list of paths) is plottable, including removing out-of-boundary paths, cutting paths into chunks, and adding refill action (also paths) at the end of each chunk.
-
Once I have the final plottable paths, my library generates two sets of outputs. The first set is a group of SVGs for visualization purposes. The second set consists of Python scripts. These Python scripts utilize the pyaxidraw library (
Q5
) to control the plotter directly with foundational plotter languages like move(), pen_up(), and pen_down().
-
I transfer these Python scripts to my Raspberry Pi, run the script, and the plotters start to move.
15. Do you have to write code? Why?
No, you don't have to write code, but I find it easier to produce the plotter instructions through code.
As mentioned in
Question 5
, you can directly plot SVGs through Inkscape. You don't need to program to generate an SVG. To produce the instruction, you can use any vector image authoring tools (e.g., Inkscape and Adobe Illustrator). If you work in Adobe Illustrator, however, it's important to remember that the default inch-to-pixel setting is different from that in Inkscape (72 vs. 96). So you need to scale your image 33% larger when plotting through Inkscape.
The general procedure for manually producing a painting instruction is as follows:
-
Draw the image. Remember that the plotter will draw every line, whether it's visible or not.
-
Figure out the refill distance and the refill path.
-
If you have curves, approximate them into lines.
-
Cut all lines into chunks that are shorter than the refill distance
-
Insert a refill path after every chunk
-
Plot the SVG
16. Why do you use Python? Can I create with X language?
I use Python because I love Python :)
Yes. You can create your plotter instructions with any language you want. As long as you can generate vector information, you can create plotter instructions. I could do a demo of using Excel to create plotter instructions someday.
More specific reasons about why I choose Python:
-
I want to manage my outputs easily. It is easy to create folders, name/rename files, and move files using Python.
-
I want to create outputs in batches quickly.
-
I want to create outputs in a variety of formats. My current library lets me easily create SVG, JPG, Python scripts, and text files.
-
Python is the primary language I use for my work.
17. Where can I learn to code? Where can I learn more about plotters?
There are plenty of free resources that teach coding. If making visual art with code is your goal, I recommend checking out
Processing
. The Processing Foundation and its fantastic suite of tools have fostered generations of creative coders. Many plotter artists use
P5.js
to create their plotter instructions.
To learn more about plotters, I recommend searching social media to find active communities. For instance,
#plottertwitter on Twitter
and
#penplotter on Instagram
. In addition, here are some additional resources that I love:
-
Pen Plotter Resources by Liz Melchor
summarizes a group of essential resources for plotters.
-
Golan Levin
had taught courses at CMU called "Drawing with Machines". The
course material
is a treasure box.
-
Casey Reas
had also shared the
syllabus of his course called "50 Years of Software Artists: Plotter Drawings to Non-fungible Tokens"
, which contains many useful resources and references.
-
Everything that Dan Catt produces
. Dan's amazing writings and videos are super fun and informative.
-
For plotter painting specifically, I recommend reading the
Watercolor (Pen) Plots article by Lars Wander
18. Is your library open-sourced? Are there any other libraries that support plotter paintings?
At the time of writing (Jan 2024), I am still working on open-sourcing my library (
See Q20
).
Although I haven't used
vpype by Antoine Beyeler
, I know it is an open-source library that provides utility functions for plotter paintings. Check out the
documentation for its split functions
.
19. How long does it take? Can your plotters paint faster?
It depends on the size and complexity of my paintings. An A3 painting could take 10-60 hours. An A1 painting could take 50-300 hours. If it takes 300 hours, it typically means that I am working with many layers of thin, transparent paint.
Yes, there are ways to speed up the painting process. Paths can be optimized, and Axidraw can move faster than my current settings. However, is it better to chase the speed? My answer is no. For my paintings, I purposely randomize the path order so that wet regions have time to dry. I also slow down the movement speed of the hardware to avoid dripping and produce more stable marks.
Art takes time.
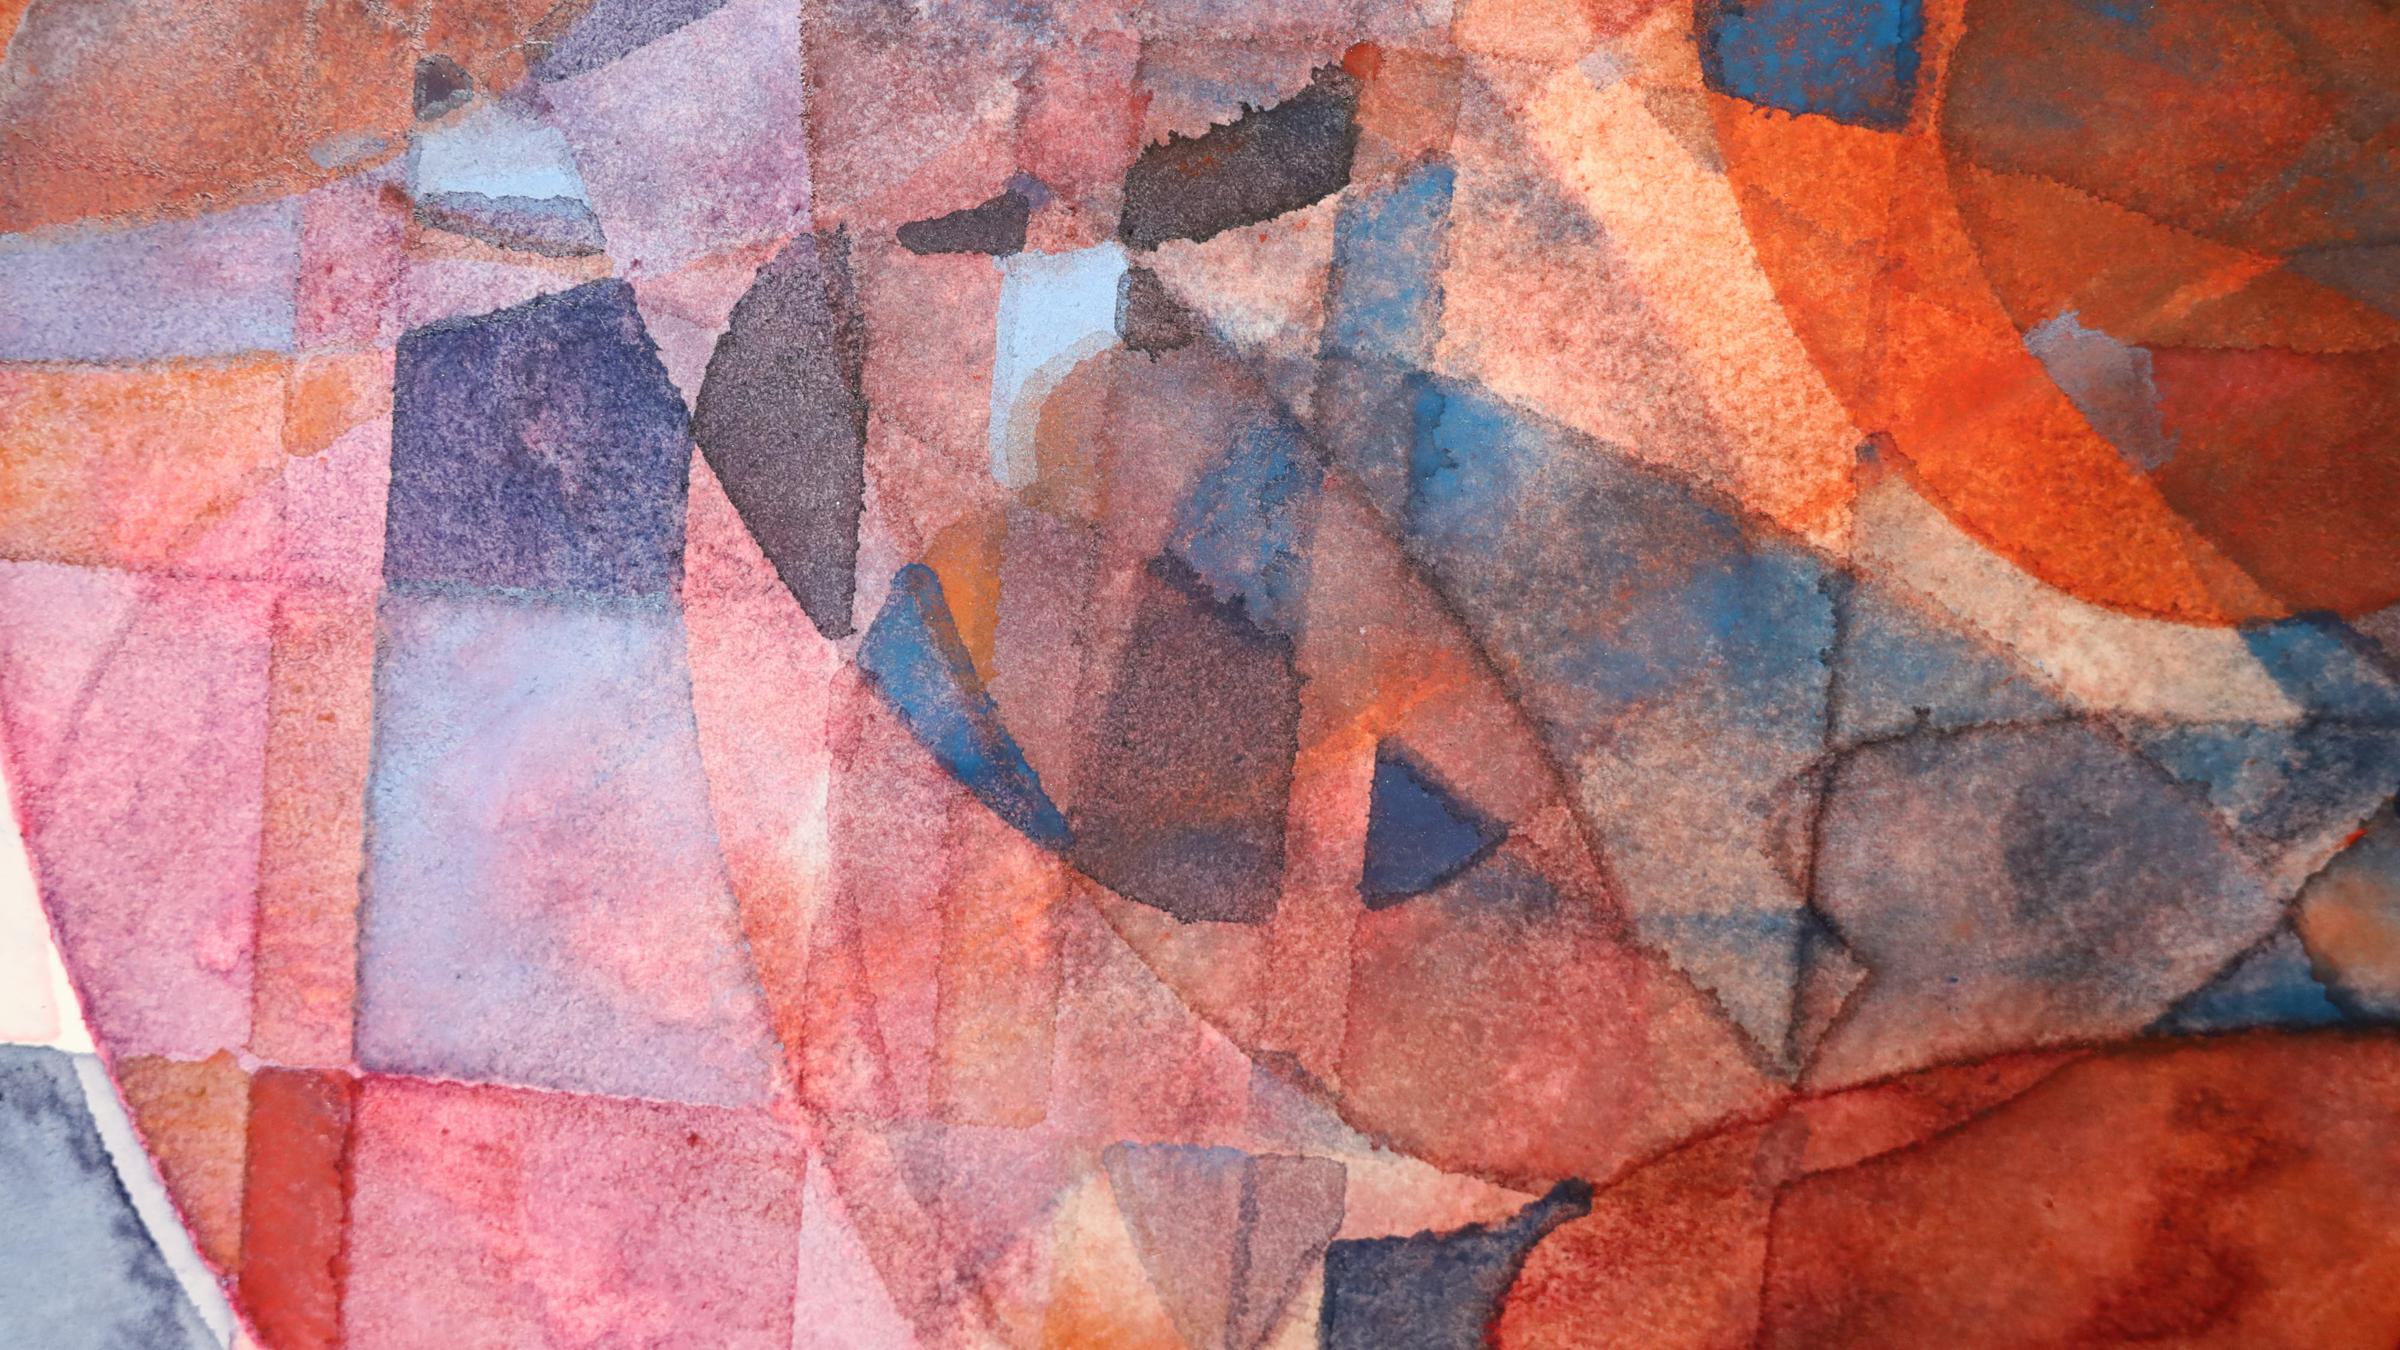
![]()
Figure 10: Details of a painting that took 280 hours. Some regions have multiple layers of wash.
`
20. Where do you get your inspiration?
I get inspiration from my life. I am consuming and producing information every single second. My generative systems are information visualizations of my living experience.
21. Where can I learn more about plotter painting?
I plan to 1) open-source my toolkit and 2) create a free video course teaching plotter paintings. I hope the course will be released in 2024.
I want your opinion about this course! If you have any suggestions, questions, or preferences about this course, please
tell me through this 1-min Google Survey
Thanks in advance!
Stay tuned! If you want to get the latest updates about my work/ my plotter course, please follow me on social media (
@Licia_He on Twitter
,
@blahblahpaperblah on Instagram
).
Thanks for reading! Happy plotting!
Licia He 2024 All Rights Reserved